
wxWidgetsとは
wxWidgetsは、Windows、Mac、Linux、Android、iOSなどのプラットフォームで動作するC++のGUIライブラリです。
wxWidgetsのインストール
- https://www.wxwidgets.org/downloads/ を開いて
Windows Installerをダウンロードします。 wxMSW-3.2.2.1-Setup.exeを実行してインストールします。- インストールされたフォルダから"C:\wxWidgets-3.2.2.1\build\msw\wx_vc17.sln"を開きます。
wx_vc17.slnを開いたらビルド>バッチビルドを選択します。すべて選択ボタンを押下し、リビルドボタンを押下します。- ビルドが終了したらいったんVisual Studioを閉じる。
サンプルプロジェクト作成
- Visual Studioを開きます。
ファイル>新規作成>プロジェクトを選択します。Windows デスクトップ アプリケーション(タブがC++、Windows、デスクトップ)を選択します。プロジェクト名にwxWidgetsSampleを入力します。作成をクリックします。wxWidgetsSampleを右クリックし、プロパティを選択します。構成プロパティ>C/C++>追加のインクルードディレクトリにC:\wxWidgets-3.2.2.1\includeとC:\wxWidgets-3.2.2.1\include\msvcを追加します。構成プロパティ>リンカー>追加のライブラリディレクトリにC:\wxWidgets-3.2.2.1\lib\vc_x64_libを追加します。wxWidgetsSample.cppを開き下記のコードに置き換えます。
#pragma comment(linker,"\"/manifestdependency:type='win32' name='Microsoft.Windows.Common-Controls' version='6.0.0.0' processorArchitecture='*' publicKeyToken='6595b64144ccf1df' language='*'\"")

#include <wx/wxprec.h>

#ifndef WX_PRECOMP
#include <wx/wx.h>
#endif

class MyApp : public wxApp
{
public:
	virtual bool OnInit();
};

class MyFrame : public wxFrame
{
public:
	MyFrame();
private:
	void OnHello(wxCommandEvent& event);
	void OnExit(wxCommandEvent& event);
	void OnAbout(wxCommandEvent& event);
};

enum
{
	ID_Hello = 1
};

wxIMPLEMENT_APP(MyApp);

bool MyApp::OnInit()
{
	MyFrame* frame = new MyFrame();
	frame->Show(true);
	return true;
}

MyFrame::MyFrame()
	: wxFrame(NULL, wxID_ANY, "Hello World")
{
	wxMenu* menuFile = new wxMenu;
	menuFile->Append(ID_Hello, "&Hello...\tCtrl-H",
		"Help string shown in status bar for this menu item");
	menuFile->AppendSeparator();
	menuFile->Append(wxID_EXIT);
	wxMenu* menuHelp = new wxMenu;
	menuHelp->Append(wxID_ABOUT);
	wxMenuBar* menuBar = new wxMenuBar;
	menuBar->Append(menuFile, "&File");
	menuBar->Append(menuHelp, "&Help");
	SetMenuBar(menuBar);

	wxButton* button1 = new wxButton(this, ID_Hello, _("Hello"), wxPoint(20, 20), wxSize(100, 32));
	Connect(ID_Hello, wxEVT_COMMAND_BUTTON_CLICKED, wxCommandEventHandler(MyFrame::OnHello));

	wxButton* button2 = new wxButton(this, wxID_ABOUT, _("About"), wxPoint(20, 60), wxSize(100, 32));
	Connect(wxID_ABOUT, wxEVT_COMMAND_BUTTON_CLICKED, wxCommandEventHandler(MyFrame::OnAbout));

	wxButton* button3 = new wxButton(this, wxID_EXIT, _("Exit"), wxPoint(20, 100), wxSize(100, 32));
	Connect(wxID_EXIT, wxEVT_COMMAND_BUTTON_CLICKED, wxCommandEventHandler(MyFrame::OnExit));

	CreateStatusBar();
	SetStatusText("Welcome to wxWidgets!");
	Bind(wxEVT_MENU, &MyFrame::OnHello, this, ID_Hello);
	Bind(wxEVT_MENU, &MyFrame::OnAbout, this, wxID_ABOUT);
	Bind(wxEVT_MENU, &MyFrame::OnExit, this, wxID_EXIT);
}

void MyFrame::OnExit(wxCommandEvent& event)
{
	Close(true);
}

void MyFrame::OnAbout(wxCommandEvent& event)
{
	wxMessageBox("This is a wxWidgets' Hello world sample",
		"About Hello World", wxOK | wxICON_INFORMATION);
}

void MyFrame::OnHello(wxCommandEvent& event)
{
	wxLogMessage("Hello world from wxWidgets!");
}
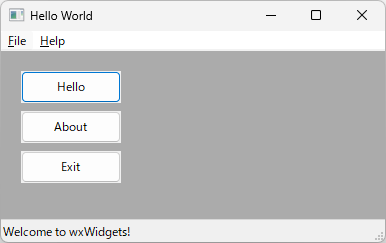
- ビルドして実行すると下記のようなウィンドウが開きます。
参考
サンプルプロジェクトを下記にあげています。 wxWidgetsSample
以上。