1
 2
 3
 4
 5
 6
 7
 8
 9
10
11
12
13
14
15
16
17
18
19
20
21
22
23
24
25
26
27
28
29
30
31
32
33
34
35
36
37
38
39
40
41
42
43
44
45
46
47
48
49
50
51
52
53
54
55
56
57
58
59
60
61
62
63
64
65
66
67
68
69
70
71
72
73
74
75
76
77
78
79
80
81
82
83
84
| #pragma comment(linker,"\"/manifestdependency:type='win32' name='Microsoft.Windows.Common-Controls' version='6.0.0.0' processorArchitecture='*' publicKeyToken='6595b64144ccf1df' language='*'\"")
#include <wx/wxprec.h>
#ifndef WX_PRECOMP
#include <wx/wx.h>
#endif
class MyApp : public wxApp
{
public:
virtual bool OnInit();
};
class MyFrame : public wxFrame
{
public:
MyFrame();
private:
void OnHello(wxCommandEvent& event);
void OnExit(wxCommandEvent& event);
void OnAbout(wxCommandEvent& event);
};
enum
{
ID_Hello = 1
};
wxIMPLEMENT_APP(MyApp);
bool MyApp::OnInit()
{
MyFrame* frame = new MyFrame();
frame->Show(true);
return true;
}
MyFrame::MyFrame()
: wxFrame(NULL, wxID_ANY, "Hello World")
{
wxMenu* menuFile = new wxMenu;
menuFile->Append(ID_Hello, "&Hello...\tCtrl-H",
"Help string shown in status bar for this menu item");
menuFile->AppendSeparator();
menuFile->Append(wxID_EXIT);
wxMenu* menuHelp = new wxMenu;
menuHelp->Append(wxID_ABOUT);
wxMenuBar* menuBar = new wxMenuBar;
menuBar->Append(menuFile, "&File");
menuBar->Append(menuHelp, "&Help");
SetMenuBar(menuBar);
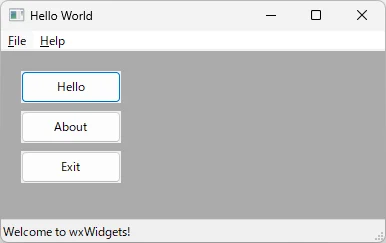
wxButton* button1 = new wxButton(this, ID_Hello, _("Hello"), wxPoint(20, 20), wxSize(100, 32));
Connect(ID_Hello, wxEVT_COMMAND_BUTTON_CLICKED, wxCommandEventHandler(MyFrame::OnHello));
wxButton* button2 = new wxButton(this, wxID_ABOUT, _("About"), wxPoint(20, 60), wxSize(100, 32));
Connect(wxID_ABOUT, wxEVT_COMMAND_BUTTON_CLICKED, wxCommandEventHandler(MyFrame::OnAbout));
wxButton* button3 = new wxButton(this, wxID_EXIT, _("Exit"), wxPoint(20, 100), wxSize(100, 32));
Connect(wxID_EXIT, wxEVT_COMMAND_BUTTON_CLICKED, wxCommandEventHandler(MyFrame::OnExit));
CreateStatusBar();
SetStatusText("Welcome to wxWidgets!");
Bind(wxEVT_MENU, &MyFrame::OnHello, this, ID_Hello);
Bind(wxEVT_MENU, &MyFrame::OnAbout, this, wxID_ABOUT);
Bind(wxEVT_MENU, &MyFrame::OnExit, this, wxID_EXIT);
}
void MyFrame::OnExit(wxCommandEvent& event)
{
Close(true);
}
void MyFrame::OnAbout(wxCommandEvent& event)
{
wxMessageBox("This is a wxWidgets' Hello world sample",
"About Hello World", wxOK | wxICON_INFORMATION);
}
void MyFrame::OnHello(wxCommandEvent& event)
{
wxLogMessage("Hello world from wxWidgets!");
}
|